
Dynamics

Intro to Dynamics
When creating a game environment it can be extremely difficult to make it appear alive and dynamic, particularly without the use of characters. As a result, the introduction of other dynamic elements were essential, and became an important part of the design process.
Before creating any dynamic elements, it was essential to gather as much resources as possible. Luckily, an urban explorer documented their excursion to the Abandoned Six Flags in New Orleans with incredibly beautiful cinematic shots of the deserted landscape²². The violent wind and crawling camera movements heighten the creepy yet magical feeling of the environment, and it became evident that mimicking these effects would really amplify the atmosphere of the scene.
Fig 19.1 - Six Flags New Orleans reference video - Cloth and dynamics

Dynamics 01
Cloth
It was evident from the art bible and SpreadMaster's YouTube video that the most necessary dynamic object in the scene was the blowing cloth. The rolling wind blowing through cloth amplified the eeriness while highlighting the age and dilapidation. However cloth is notoriously difficult in games engines - it is often overly complex to create and can become very expensive in game. And so, researching and testing various techniques was essential to receiving the correct result.
In past projects I was able to surpass the need for complex cloth simulations by applying Unreal Engine's Simple Grass Wind node in the Material Editor, but the result is very basic and did not match the fluid flowing cloth of the reference video. Subsequently, research into more advanced techniques was necessary.
Cloth 01
Real-time cloth with nvidia physx
The first approach tested for creating cloth in Unreal Engine used NVIDIA's PhysX real-time simulation plugin for Maya and Unreal Engine. "NVIDIA® PhysX® is a powerful physics engine enabling real-time physics in leading edge PC games. PhysX software is widely adopted by over 150 games and is used by more than 10,000 developers. PhysX is optimized for hardware acceleration by massively parallel processors. GeForce GPUs with PhysX provide an exponential increase in physics processing power taking gaming physics to the next level."²³ Many impressive games use PhysX (Batman: Arkham City²⁴ and Mirror's Edge²⁵ comparison videos below), and as a result I decided it was worth exploring for the blowing cloth simulations.
Fig 20.1 - PhysX in Batman: Arkham City
Fig 20.2 - PhysX in Mirror's Edge

Fig 20.3 - Example of PhysX cloth in Batman: Arkham City


Similarly to an nCloth simulation all attributes for the cloth can be changed within the attribute editor in Maya. Vertex painting was used to pin certain vertices from moving, and various attributes like friction and drag were altered to give the specific look and feel to the cloth simulation. Simulating wind in Maya was troublesome, and it was difficult to get accurate results, hence the process became a two-way process, alternating between Maya and Unreal Engine to receive accurate results.
The export process is slightly more complex than usual. When exporting it is necessary to export an .apx for each cloth piece, alongside the typical .fbx. This .apx file can be imported into Unreal Engine, and assigned to the object via the Skeletal Mesh Editor.
There are numerous positive and negative aspects to using this APEX PhysX cloth method. The first major positive is that it responds to a universal wind, meaning multiple cloth meshes will respond accurately to the same wind (Fig 20.7).Secondly, in-game interactions are possible, and yield accurate cloth-like results (Fig 20.8). It is also possible to create tearable cloth.
Fig 20.7 - Universal Wind
Fig 20.8 - Interaction
The drawbacks are also clear, however. Firstly, it is very difficult to achieve an accurate look for the cloth and it often looks sharp and rigid, like Fig 20.7 and 20.8 above. Secondly it is quite expensive to run, and would typically be used for hero assets (which these curtains were certainly not). It is also very difficult and time consuming to set up collisions for PhysX cloth.
Ultimately, after testing out PhysX cloth in numerous scenarios, I decided to avoid using it in this project. It would be particularly useful in a third-person game environment, where the character needs to interact with the cloth, but it was too costly and too difficult to achieve high results for this environment, and so I moved on to explore a different approach that would.
Unfortunately, the amount of PhysX tutorials online are quite low, but a great tutorial by Tales of Nalstone²⁶ uses PhysX for the cloth on a character, but the process could be altered for non-character cloth simulations also. PhysX uses APEX Cloth simulations, and to create them you must first download the APEX Cloth plug-in for Maya. Once installed, you can create the cloth simulation in Maya. Traditional cloth would be created using nCloth, Maya's own cloth simulation software, but nCloth is not suitable for games engines by default. Hence, in order to create PhysX or Apex cloth we need to first assign the Apex Cloth solver. Next, each cloth object must have its own separate material. In the below example I explored creating curtains in engine, and so I assigned two arbitrary materials to each curtain in Maya.
Cloth 02
Blend Shapes
After deciding to avoid the use of PhysX it was necessary to revert to alternative methods. As the cloth did not need to be interacted with by the player, the calculations did not need to simulate in real time. This suggested the use of baked, pre-calculated cloth simulations.
The first baked simulation attempted included the use of animated blend shapes in Maya and Unreal Engine. Traditionally, one would need to skin a cloth to a series of bones, but with the use of blend shapes one can blend between a series of meshes (as long as each mesh has the same number of vertices). This alters the position of each vertex on the mesh to match the new blend shape.
As the simulation will be baked into a series of blend shapes, the cloth simulation could be carried out using Maya's nCloth. The first step in the process was to create the cloth simulation in nCloth which was then cached to prevent alteration (Fig 21.1). From this cache I could extract meshes at various intervals (Fig 21.2). Lastly I could set up the extracted meshes as Blend Shapes, and morph the original mesh to the shape of each blend shape.
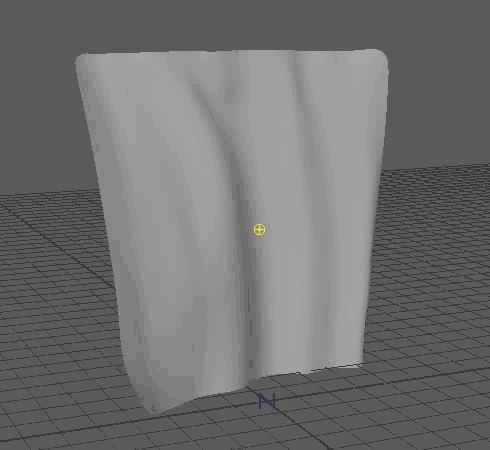
Fig 21.1 - Cloth Sim


Fig 21.2 - Blend Shapes

Fig 21.3 - Blending between
Cloth 03
Alembic cloth
While the blend shape approach above was working well, Epic Games released version 4.14 of Unreal Engine with stable support for Alembic caches. Typically simulations are very unpredictable. "Alembic, an open-source development effort headed by Lucasfilm and Sony Pictures Imageworks, is designed to address this issue". "The Alembic format is being adopted as an evolving standard by many third-party software vendors, and ultimately, looks to become adopted near-universally"²⁷. Unreal Engine now supports the use of Alembic (.abc) file formats, meaning simulations can be cached from Maya and imported directly into the engine with per-vertex transform information. This, however, is incredibly expensive and could not really be used for the cloth simulations in this environment. Fortunately, Unreal Engine supports the import of Alembic files as skeletal meshes, in which it creates blend shapes automatically, and attaches the relevant animation. This basically negates the need for creating complex blend shape meshes (As discussed previously) as it will automatically extract the blend shapes from the Alembic file and re-create the simulation in-engine. This is significantly cheaper to run in game as it is almost identical to the traditional process of creating blend shapes, while saving time in the creation process.
The developers at Unreal Engine ran an informative live-stream²⁸ where they explored the method of importing alembic files into Unreal Engine, which was used as a constant source of reference throughout the process.
The cloth was first modelled quickly in Maya. As this cloth mesh below is a hero piece the resolution could be considerably higher.

Then an nCloth simulation was created. Because simulations are quite sensitive to a lot of values and many forces dictate the resulting look, it took a long time with a lot of trial and error to receive the desired look. Once achieved the simulation was cached using nCache.


As this simulation was to run in-game it was essential to make the animation loop convincingly. To achieve a looping animation I simply re-imported the existing cache, and opened the Trax Editor in Maya. I decided to loop the animation around frame 250. Therefore I moved the first cache so that the simulation would start at frame 250, and moved the second simulation so that it would end at frame 250. I could then blend between the two caches using a Cache Blend node.

The result is a looping cloth cache. This looping cache could then be exported as an alembic cache.
Then I could texture the cloth in Substance Painter using the original mesh.

Finally the alembic cache could be imported into Unreal Engine. On import one can select whether to import as an static mesh, alembic or skeletal mesh. Choosing skeletal mesh produces the option for creating blend shapes from the alembic cache. For this mesh, as it was a hero asset and the animation was quite long, I chose to convert 10% of the animation into blend shapes. The result is a rather convincing cloth animation.
The alembic cloth process was quite user-friendly, and negated the need for following the older processes. Hence, the alembic format was used for every cloth asset in the environment, including smaller cloth pieces and bunting.
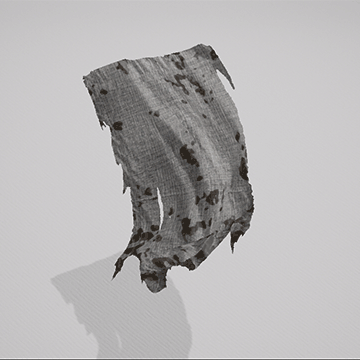

Fig 22.7 - Small cloth
Fig 22.7 - Bunting
Learning Outcomes
The process of creating cloth for video games is lengthy and relatively complex. It quickly became one of the biggest hurdles in this project, but the inclusion really added to the scene and helped to encourage the abandoned and eerie feeling within the environment. I learned a number of useful necessities and tweaks throughout the process which will definitely benefit future environment creation.
1 - Keep the animation as short as possible
When creating a cloth simulation, it is essential to create a short looping animation, ideally with subtle simulation so the looping is not too obvious. The cloth on the gazebo in the abandoned theme park is 750 frames, and causes frame rate to dip significantly. However, the small cloth simulation is only 100 frames and barely affects frame rate at all.
2 - Re-use the same animation with a different start time
In many places throughout the scene it was necessary to insert cloth. Rather than re-creating each cloth simulation separately I figured out I could re-use the same cloth simulation, scale it slightly and change the start time of the animation (Fig 23.2). This added variation without the need for creating more cloth, thus saving time and making the game environment more efficient.

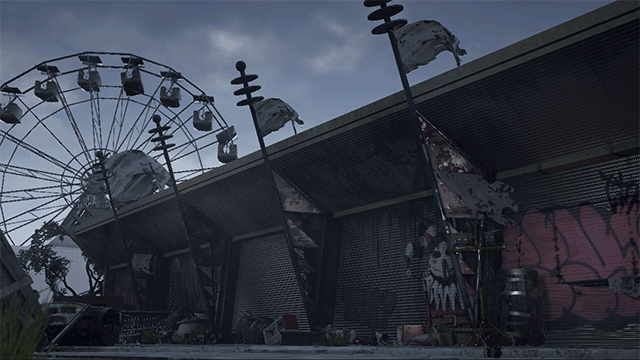
Fig 23.1 - Cloth with same starting point
Fig 23.2 - Cloth with different starting point
Cloth Result
Fig 24.1 - Cloth overview
The subtle blow of the cloth really adds to the atmosphere of the scene, and emphasises the eerie and creepy ambience. It also helps to break up the silhouette of the buildings (Fig 24.3), adding more interest and intrigue. Finally, it adds visual interest within the buildings (Fig 24.2), once again solidifying the creepy feeling maintained throughout the scene.
Fig 24.2 - Cloth inside buildings
Fig 24.3 - Silhouette
Other Dynamics
It was clear that adding dynamic elements to the environment really emphasised the creepy atmosphere, and so numerous other dynamic elements were introduced. The introduction of a flashlight also heightened this atmosphere. Many of the reference imagery and videos were lit exclusively with flash lights, and so the introduction of a flashlight blueprint was necessary. After researching The Last of Us²⁹, I noticed there was a subtle delay to the movement of the flashlight, and this amplified the eerie feeling. As a result, I decided to mimic this effect in the abandoned theme park using a Spring Arm component to add a delay (This method was covered in detail on my personal blog³⁰.)
Fig 25.1 - The Last of Us Flashlight Delay.
Fig 25.2 - Flashlight delay.
In an attempt to create more intrigue and dynamics, the addition of a falling ice cream cone was introduced, and is triggered by walking through a trigger volume. This effect definitely needs more fine-tuning, but it adds a subtle touch to the environment as it is.
Fig 25.3 - Falling cone blueprint.
Numerous other dynamic elements were introduced to the scene in an attempt to heighten the overall atmosphere of the environment. Dust particles fill the air. Grass blows gently in the wind. The old abandoned ferris wheel rocks backward and forward slightly.
If the oppertunity arose to create a sequel environment, more emphasis would certainly be placed on the inclusion of dynamic elements to the environment. While the above dynamics convincingly intensify the atmosphere, I would like to add more to achieve the look and feel of the reference imagery and videos. The inclusion of more jump-scares would help create a scary environment without doubt, as well as dynamic changes in lighting and sound.
References
²² SpreadMaster (2010) Abandoned Six flags New Orleans tour. Available at: https://www.youtube.com/watch?v=Bcja8UBtXdk (Accessed: 9 December 2016).
²³ NVIDIA Corporation. (2016) PhysX FAQ. Available at: http://www.nvidia.com/object/physx_faq.html (Accessed: 9 December 2016).
²⁴ Zogrim (2011) GPU PhysX in Batman: Arkham city. Available at: https://www.youtube.com/watch?v=j7lr7B9k9SA (Accessed: 9 December 2016).
²⁵ Machinima (2008) Mirror’s edge - PhysX comparison (game trailer HD). Available at: https://www.youtube.com/watch?v=w0xRJt8rcmY&t=28s (Accessed: 9 December 2016).
²⁶ Tales of Nalstone (2015) Basic unreal engine 4 apex cloth. Available at: https://www.youtube.com/watch?v=uTOELBNBt04&t=242s (Accessed: 9 December 2016).
²⁷ Dunlop, R. (2014) Production Pipeline Fundamentals for Film and Games. London, United Kingdom: Taylor and Francis.
²⁸ Unreal Engine (2016) 4.13 animation features part 1 and September UE4Jam theme - unreal Livestream. Available at: https://www.youtube.com/watch?v=h2egrj1pXzw&t=3694s (Accessed: 10 December 2016).
²⁹ Naughty Dog and Sony Computer Entertainment America LLC (2013), ‘The Last of Us’, Video Game, Naughty Dog
³⁰ O’Keeffe, George. (2016) Lighting Test. Available at: https://georgeokeeffegameart.wordpress.com/2016/10/11/lighting-test/ (Accessed: 10 December 2016).